Step 1 : CLOSE THE FILES OR FOLDER, IF OPEN. To password protect folders in VISTA, you should first close them. This is particularly true if you are setting password protection to an executable file (.exe) or a folder that contains an executable file (also called a program). If you are unsure of an executable file's status, press control+alt+delete to view all programs running.
Step 2 : LOCATE THE FILES OR FOLDERS YOU WISH TO PASSWORD PROTECT. Do not click to open the file or folder. You can find files or folders by using the "COMPUTER" tool in your Vista Start Menu.
Step 3 : RIGHT CLICK ON THE FILE OR FOLDER'S ICON. To access the option to password protect folders in VISTA, right click on the file or folder icon. Select "Properties", at the bottom of the resulting pop-up menu.
Step 4 : CLICK THE 'SECURITY' TAB IN POP-UP WINDOW. In the pop-up Properties menu, click the 'SECURITY' tab on the top right of the pop-up window.
Step 5 : CHANGE FOLDER PERMISSIONS. In the Security menu, you will see two white text boxes. The top box shows various users and user groups on your computer. Highlight the user group you wish to deny access to the program and click the "edit" button between the two boxes. You should now be able to add or deny access to the program for the selected user by clicking options in the bottom white text box. Edit the options for each user or user group you wish to deny access to. Click apply after editing for each user. When finished, click "OK". Next, click "OK" on the Security window to approve changes. You have locked the program down and users must now access your Vista user account by password to access the program. Once logged into your Windows Vista user account, you will now have to supply the password to access the file or folder.
Step 6 : TEST ~ To make sure you actually did lock Internet Explorer, try to open the program. Log out of your user account and log in as the user you have locked out of file or folder. If you are unable to locate the file or folder as the prohibited user, you did password protect folder in Vista.
Sunday, August 23, 2009
Monday, August 17, 2009
How to connect a new computer to wireless internet?
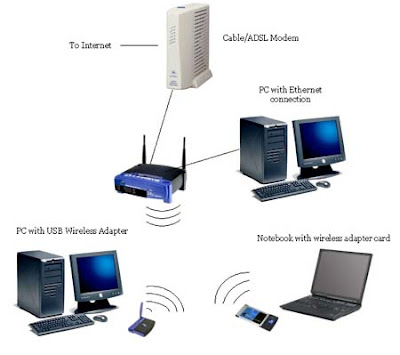
Option 1: First, you'll have to find out who your Internet Service Provider (ISP) is. I use Verizon DSL.
-Then, if the company sent you a router, you need to look on the back for a listing of the WEP, or secure connection password (If you don't have a WEP, this will be addressed further on.
-When you find the WEP, then each of your computers needs to have a Wireless Card Adapter OR a Buffalo Air-station (or similar product). This is very, very important. It is impossible to have a wireless connection without a wireless adapter.
-When you have prepared all of your computers and have the WEP memorized or written down, then continue to the next step.
-Assuming you're using Windows (Vista instructions are probably similar, but these are for XP), go to:
-Start > My Network Places > "Set up a wireless network...."
(Should be on the left side menu), and then follow the instructions.
-IF YOU DON'T HAVE A WEP, then the most common alternative password you can use is "admin" without quotes.
-IF "My Network Places" isn't listed on your start menu, then follow these instructions: Right click the start menu and select "Properties" > Click "Customize" > Advanced Tab > Make sure the "My Network Places" box is ticked/checked > Select OK > Apply > OK and then re-open the start menu and you will have the icon listed.
Monday, August 10, 2009
How to configure my D-Link Router?

Step 1: Connect your laptop or desktop computer to the D-Link router with an Ethernet cable. Open your web browser and enter the following IP address in the web address window: 192.168.1.1. Login to the router through using the default login name admin and default password admin.
Step 2: Select the "Setup" menu at the top of the D-Link router home page and select "New Connection" on the next window. On the setup screen which then appears, select the type "Bridge" and input the number "35" into the VCI field.
Step 3: Select "Tools" and "System Commands" from the D-Link router page menu and click the "Restart" button. This will restart the D-Link router with the configurations saved.
Step 4: Open the "Control Panel" icon on your computer and select the "Network Connections" icon. On the menu screen that appears, double left click the "Create a New Connection" icon.
Step 5: On the resulting screen, select "Connect to Internet" and "Set Up My Connection Manually." Then, select the menu selection which states "Connect using a broadband connection" and the "Enter ISP Name" menu option that appears. Select the "Apply" menu option and the D-Link DSL router settings will be saved.
Subscribe to:
Posts (Atom)